Welcome to another Vintage Quilt Thursday!! Today I am sharing a tutorial for a bow tie block.
You can check out the vintage inspiration here.
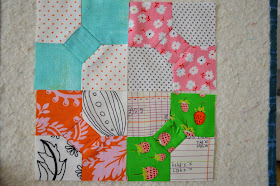
The picture above shows 4 of the blocks put together. Since I am not making a full quilt with the blocks I put 4 together to make one bigger block. This 4 unit block is 7.5" unfinished.
First, CLICK HERE to print out our template. It has 2 pieces, A and B, that you will use to cut our your pieces. You can use the cut paper to trace (that's what I did) or you can trace it on to heavier card stock.
You will need (per block):
1 B piece of bow tie fabric
2 A pieces of bow tie fabric
2 A pieces of background fabric
Trace and cut out these pieces using the printed and cut templates.
This block uses Y seams, or partial seams, so I marked a few of the pieces to help me know when to stop my seam.
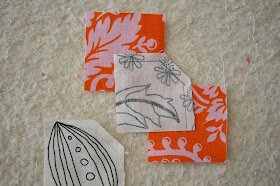
One the middle square draw a line on each side 1/4" from the edge. Do the same for the background A pieces. I used a Frixon pen. The drawn line disappears with the heat of an iron.
First we are going to sew the middle bow tie. With right sides together sew the middle B square to the A piece.
Sew your seam just on the drawn line.
Do the same for the other middle square and A piece. Can you see my seam, how it doesn't go all the way from one edge to the other?
Iron your seams
Now for the background pieces. With right sides together lay your background piece on the middle square. Sew a line following the drawn line, starting and stopping before each end.
This step is hard to photograph and will make more sense when you get to this step and can see it in person.
Fold the bow tie unit to the side and line up the background outside edge with the bow tie edge.
Sew your seam from the point (at the edge of my thumb) to the outside edge.
I had to unpick a few seams at this step to get a feel for how far the seam should go to the middle. It doesn't have to be perfect, ironing will help it lay flat.
Sew your seam the same way on the other side of the same piece.
Repeat for your opposite A background block.
Iron and trim. This block is 4" unfinished.
Here is the back.
If you are putting blocks together, like I did, without sashing, there are a few ways to orient the blocks.
This way I create a colorful 4 patch in the middle.
And if I sew them this way I get a different look and all the bow ties go in the same direction.
The 4 patch method will also give you a 4 patch of background fabrics. This would make a fun ring effect with the bow ties.
So, clear as mud? This was a bit more challenging block if you haven't tackled Y seams before.
Check out this new fabric I listed in our Etsy shop. I love the low volume effect with pops of teal. And it has a doily so you know I love it. It is also in our webstore.
See you next time for another Vintage Quilt Thursday inspiration quilt. You can check out our past Vintage Quilt inspirations and tutorials by clicking on the link at the top of the blog.


No comments:
Post a Comment