Tuesday, September 22, 2015

Goodbye Quilt Barn - Hello New Adventures!

As most of you know, The Quilt Barn closed it's doors in April, 2015.  The store is no longer, websites are gone, and Tara and I have already dived into some new adventures!

Tara is usually the one who posts all the amazing tutorials and ideas on this blog - she is so talented!  She will continue to post, but soon will start posting on my new blog:  www.sew4mysanity.blogspot.com.   When that transition is made, you will be notified when you visit the blog and will need to follow us at the new blog address.  We have big plans for this fall!  Look forward to some great new tutorials and lots of "vintage" fun!

Heather is now machine quilting from her quilting studio in the old "Hen House" just behind the old Quilt Barn.  There are no shop hours, so quilts are dropped off and picked up by appointment.  Get those Christmas Quilts in by October 25th to guarantee them before Christmas!  Call Heather at (208) 420-3484 to make an appointment.

We have been crafting away, getting ready to be a vendor in the Vintage Vixens Fall Market!  
If you missed in this spring, you missed alot!  Click on the link to check out all the Vendors and get the details so you can add it to your calendar!  We will be there with quilts and other "vintage" home decor items and great prices!

Meanwhile, I want to let all of you locals know - I have a used Janome 3160QDC for sale.  If you are interested, give me a call or shoot me an email at sew4mysanity@gmail.com.

Thanks for sticking with us - we have great things for you coming up!

Heather & Tara 


Friday, September 11, 2015

Scrappy Strawberry Blocks


Have you seen the scrappy pineapple blocks on Instagram by  @holly_inez ? I saw them and thought how fun and cheerful. I have almost zero yellow in my stash. Bummer. I do have a lot of pink 2.5" squares. After I finish a project and have scraps I cut them into either 5" charms or 2.5" mini charms. I was halfway there!
 

I ended up making 9 blocks. One red one and 8 pink. I tried to separate the pinks by shade. The lone red berry used up all my red.


Now they sit on my cutting table chair waiting for inspiration for what to do with them next.


My last berry I pieced all laid out on my personal block size design board. I can carry the board from my cutting table to my sewing machine. You can find the tutorial on Lori Holt's blog, Bee in My Bonnet.

Free Strawberry tutorial can be found here, at Skyberries Handmade. I used 2.5" squares instead (its what I had on hand) instead of what she uses in her tutorial. The leaves I had to cut bigger as well and trim down to 2.5" half square triangles.

As always, you can find Heather and I on Instagram. Stop by and say hi!

Tara @tinyglutton
Heather @thequiltbarn
Free Image Hosting at www.picturetrail.com

Wednesday, August 26, 2015

Dyeing Vintage Linens


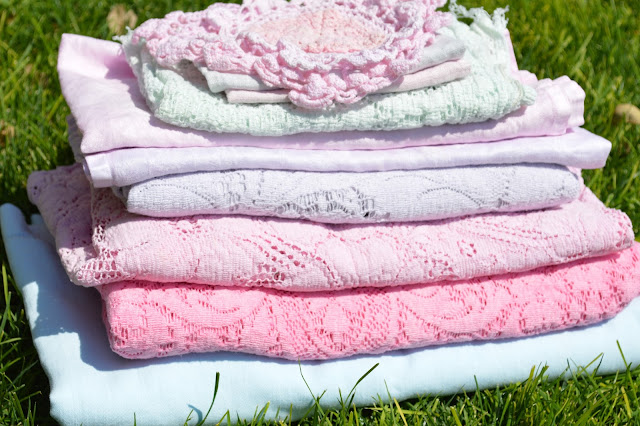
After the wedding I had a substantial pile of vintage linens and lace table cloths. Most were bought on the cheap in thrift shops. One can, in fact, have too make cream linen and lace table cloths so I decided to dye a couple (the family heirloom pieces were spared this experiment).

I also tossed in a few napkins and doilies.


 I used Rit Dye, both the powder and liquid and I used my sink kitchen sinks. One to dye and one to rinse. This worked for most pieces except the bottom linen cloth. It was probably too big and a little heavy after wet and hard to rinse.


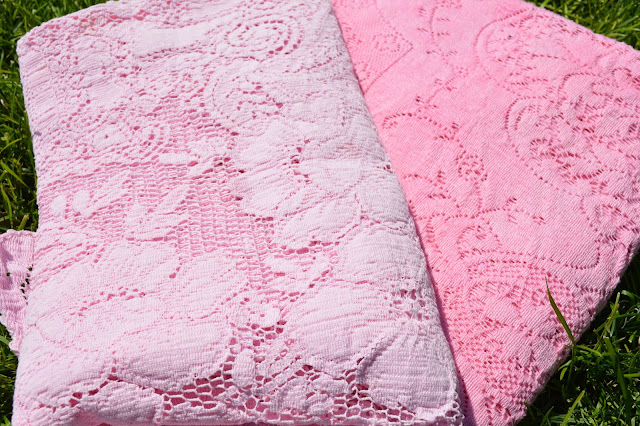
First up, the pink.

The darker tablecloth had a soak time of about 20 minutes and the lighter one was 5 minutes. I washed and dried all items in my machines so this is the final color.


The doilies were soaked for about 5 minutes and you can see there is some variation in color.


These napkins are the exact same yet very different colors. Interesting.


I didn't have much luck with the Teal or Aquamarine (both liquid versions).

The linen cloth on the left is Teal. The final color is very light.

The next lace piece is Aquamarine but turned out purplish. I might try and over dye it with pink some other time. 

The last piece is the Aquamarine again. The color looks pretty good here but it actually very pale.

I think I will stick to the powder versions of the Rit Dye. My local shops didn't have much of a selection so I might try and buy online for a better selection.

I might try dyeing white tone on tone fat quarters just to see what happens.

Have you tried your hand at dyeing?

Thursday, August 20, 2015

Pink Little Houses Quilt


My little pink houses quilt is done. I didn't realize how wrinkly it was until I saw it held up for a pic. I think I may need to wash it before I list it for sale. Washed quilts have a great crinkly, vintage feel to them anyway.

I used a scrap pack of pinks, a few yellows, and a bunch of Moda Essential Dots in a pale pink (I don't think the dots show up here but, take my word for it, they are adorable).


The pattern is Suburbs by Cluck Cluck Sew
 
I quilted across each row and going up, over, and down each door then quilted the vertical rows.

I think I will wash it up and share a new picture later. I want to see if there is a noticeable difference .

Monday, August 10, 2015

Quilt in a Day


I woke up one day last week and had to make a quilt and it needed to be finished in a day. My teen was telling me about a friend of hers and I knew I needed to give her a quilt.

I searched my quilt closet first (I have a few finished quilts ready to gift) but none of them said teen girl to me.

I ended up using some of my scrap charm squares. When my scrap bucket gets a little full I spend a bit of time cutting out charm squares, mini charms, and 2.5" strips.
 

I took out red and navy charms and ended up with a soft sherbert pallet.
I quilted in the ditch and attached the binding by machine.

I ended up liking this quilt and the sewing process I made a similar quilt with low volume charms.

This year I set a New Year's resolution to give away 10 quilts this year and I am up to 6.

You can find Heather and I on Instagram

Heather @thequiltbarn
Tara (me) @tinyglutton

Free Image Hosting at www.picturetrail.com

Monday, August 3, 2015

Sharing Vintage Quilts


I visited a friend and got a chance to take a look at some family quilts. Above is a very bright  (I think the fabrics must have been kept out of the sun) quilt using half square triangles and dresden plates. While this is a traditional quilt it looks very modern too. The top middle square's use of bright, sunny yellow is a fun departure from the expected.

This quilt also happens to be backed by another quilt. There is no binding and one quilts wraps around to the front. My friend says she has peeked through an small open seam and says there is a third quilt inside as batting!

I would love to know what the hidden, inside quilt looks like. As you can imagine, this quilt is very heavy. A winter quilt I am sure.


Another well loved quilt. The large missing piece (bottom middle of quilt) almost relegated this family quilt to the donate pile, or worse, the garbage bin. Thankfully, my friend saved it (it was her husband's mother's quilt).

As you can see on the backing, this quilt was heavily hand quilted. I would guess inch spaced lines.

Big thanks to my friend for letting my fondle her quilts and take pics. I have a few more to share and I have taken notes on a few so I can attempt to recreate the blocks.

If you are ever in Riggins, Idaho, stop by her antique shop on Main St, Two Ladies Antiquities

Check out our machine quilting services. You can mail your top and backing in to our shop and we will mail your quilted to back to you

Instagram
Heather: @thequiltbarn
Tara (me!): @tinyglutton

Facebook
The Quilt Barn

Monday, July 27, 2015

Cheap and Easy Homemade Laundry Soap


 I have something a little different for you today. I have been making laundry soap for a few years now and today was the day I needed to make a new batch. I thought I would take a few pictures and share the recipe with you.

It is very easy (takes about 10 minutes) and cheap. This batch is around $8 and will last many months. I make 3 batches a year.
Does it really work? It does. It will get your clothes clean and odor free.

Tools:
large bowl
cheese grater
container for your soap
old teaspoon
wooden spoon
 

Ingredients:
-2 bars of Felt Naptha soap. Grate it up using a cheese grater. 
-Box of Borax. Half of the box. Save the rest for your next batch (I poor the powder outuntil it feels like half)
-Box of Arm and Hammer Washing Soda. Again,  half a box

Mix together in a bowl. Sometimes I have added a few scoops of Oxy Clean (or Biz).


Fill a container and pop in a tablespoon you aren't using (you can pick up all the tools from a thrift shop) . All you need to add to your washing machine  is one teaspoon (I use a front loader. Not sure that makes a difference).

This recipe makes a large batch and I keep what doesn't fit in my glass container in an empty oatmeal tube.

That's all, super easy and inexpensive

Saturday, June 27, 2015

Using Those Teeny Scraps


 My mom is the hardest person to buy for.  I always have my eyes out for a new little something to make her. Because she lives in another country, and shipping is ridiculous, I give her Mothers Day and Birthday presents when I see her on our annual visit.

I have been keeping this box around for a project for a while and my brain cells made a gift-box connection.


It is the perfect container to add some fun sewing related bit and bobs.

What You Need:
wood box (I believe this box was a cigar box)
spray paint (optional)
Modge Podge
sponge/brush
fabric scraps
scissors

How To:

-spray paint the inside and lid sides of the box. Let dry between coats. I applied 3 coats. This step is optional but adds a nice pop of color

-iron and cut fabric scraps into various sizes. My scraps came from a pile of scraps no wider on one side than 2.5" (those scraps get cut into 2.5" squares)

-apply a layer of Modge Podge on a small area. Lay a scrap on top and add another layer of Modge Podge on top of the fabric. Keep going, working in small areas, adding more scraps, slightly overlapping each piece. You may get some fabric fraying. I picked those string bits off as I went.

-dry overnight. All done!

This project only took about 30 minutes. I am now on the hunt for wood boxes with lids. It makes a great gift box and can then hold treasures

Follow Heather on Instagram @thequiltbarn and her destash account @thequiltbarndestash.
I am @tinyglutton

Check out great machine quilting options here. Let Heather help you finish your labor of love for a fantastic finished quilt


Monday, June 22, 2015

Baby Pink Hexie Quilt


 I just can't seem to quilt hexies. This is my 3rd hexie quilt (I think) and I am working on my fourth. I really enjoy relaxing by hand sewing these hexies.

 I have tried glue basting and I like how fast the process is but I don't like the result when I take out the papers (the edges need to be fussed with and ironed).

 I gathered up all my pink scraps/stash and sewed up a bunch of hexie flowers.
 

  I quilted by sewing in the ditch and finished it off with a hand sewn binding. I machine washed and dried the quilt and it crinkled up nicely.

 Quilt Particulars:
-tutorial to make hexies and a larger version of this quilt here
-grey fabric is a Moda solid, Fog
-flower centers is by Lori Holt, Vintage Happy
-1" english paper pieces
-42 flowers
-294 hexies
-grey squares are cut 6.25"
quilt finishes 36"X42"
 

Wednesday, June 10, 2015

Log Cabin Super Finish


 I really love this quilt. My main quilting style is scrappy and this is certainly is scrappy. I started with a 2.5" square for the middle and attached 2.5" strips (low volume to one side and brights to the other) and trimmed as I went.


A close up of some of the prints I used. It used up a bunch of scraps. I hand quilted this and sent it off to a friend's daughter.

I have a goal of giving away 8 quilts this year (ones I have already completed or old unfinished quilt tops I finish). I am up to 4 so far and have plans for another 3 this summer. So close.

Check out this awesome extra wide backing I bought for another UFO I want to finish. I just need to decide on how to quilt it
Free Image Hosting at www.picturetrail.com

Tuesday, June 2, 2015

Granny Square Quilt


Schools out for summer!! I don't ever remember being this happy to be on a school break. Its been a good year but I am ready to have fun and sleep in (and by sleep in I mean 7:45, if I'm lucky).
I have been clothing sewing with a deadline for a while now and I am looking forward to getting back in to some serious quilt sewing.

This is a WIP (work in progress) that I finished up. Every January I hold myself to working exclusively on WIPs.  This pattern is called a Granny Square Quilt.


I had help making the blocks. The Modern Sewing Guild here held a block swap type of thing. Those who wanted to participate helped another quilter by making a few of their blocks. For my month I passed out  a baggie with colored and white squares and got back finished squares. I used a lot of prints from the designer, Aneela Hoey.

Most of my blocks are cohesive but the last few I pieced I made them a little more random and scrappy.

To quilt it I ditch quilted up and down each sashing strip. The binding is a fun red polka dot.


I have been trying out places in my yard to find the best spot to take quilt glamour shots. Not sure I have found it yet. I tried out hanging the quilt on our rabbit hutch here. No rabbits live inside. Wiley critters escaped. We currently have one rabbit who lives on our 2 acre property, a pair and their baby moved to our neighbors house (the neighbors don't mind), and another neighbor baby was re-homed.

You can find the free tutorial for this quilt here . You can also find no waste methods and tutorials for different size blocks. Pinterest is my go to search site.

Also, we are going to the Utah Shop Hop this week. I hope I can meet some new quilters and have a great road trip. Be sure to follow our adventures on Instagram and a recap here later.

You can find Heather on Instagram @thequiltbarn She will be having some great fabric destashes so be sure to add her to your Follow list

I am @tinyglutton

 Free Image Hosting at www.picturetrail.com

Friday, May 29, 2015

Alice in Wonderland Backpack


My girls have a Disneyland trip planned for the summer and I just had to make something special.
Each girl also has several Disney Bounding outfits in the works. That's 8 handmade outfits. I think I can, I think I can....


I used Simplicity pattern 1388. The pattern was OK.  Not bad, not terrific. The drawings for the front pocket were a little confusing and I had trouble with the zipper gusset fitting. The upside was it only took 3/4 yard for the outside and didn't have many pieces.

The pictures show a backpack with nothing in it. The fusible fleece and light weight fusible interfacing seem sufficient. It is, however, empty so I hope it holds up when stuff is in it.

Did you see Heather has Gardenvale, by Jen Kingwell, in the shop?  I helped fold fat quarters and I am itching to make something with this fun fabric.
Free Image Hosting at www.picturetrail.com

Tuesday, April 21, 2015

Scrap Jar Stars Guild Quilt


Last year our small Modern Guild swapped blocks using a free tutorial from A Little Bit Biased,  Scrap Jar Stars.

Each person was given one color (I was green), they made 12 of that color blocks, then we swapped and ended up with 12 different colors blocks.

I joined my blocks without sashing, creating a simple 4 patch. You can also add sashing a create a 9 patch block.  Trina decided to make her quilt bigger and is making more blocks on her own.


My green block.

There was a little trouble with differing quarter inch blocks (some blocks were up to a half inch bigger or smaller than others. I found I needed to use a very scant quarter inch to make the block square up to the stated size. It might be helpful to make a tester block first.

I machine quilted this one myself as I had easy lines to follow and it wasn't too big to wrangle on my home machine. And yes, one block was put together with a rotated section. I didn't fix it but kept it because it reminds me of the lady who made it.

I recently finished a king size quilt (I will share soon) and there was no way I was quilting that one myself. Heather did a great job and used a new to her pattern that worked out great.

Need a quilt quilted? Heather can also do your binding for you. Check out this page for details and great pricing. I know some people think a king size quilt would cost and arm and a leg but Heather's pricing scale is great.

Monday, April 13, 2015

Finished Modern Building Blocks


I finally finished my Moda Modern Building Blocks quilt. Today is lovely but very windy. No good for quilt photos. Inside photos it is.
 Under this quilt is an old one in rotation on my bed. The pattern is Hills n' Hollers by Denyse Schmidt. The fabric is an oop (out of print) line called Hope Valley (same designer as the pattern). It was one of the first quilts Heather quilted for me. It is a figure 8 pattern. Its one of my favorite quilting patterns.


Photo with my cat. Cats and quilts go together.
I deviated from the pattern. I didn't use all the blocks. I mostly skipped the biggest ones. I  ran out of steam and large scraps. I really wanted to use up scraps and the bigger blocks required more.
I added in a Lori Holt Bee in my Bonnet Birthday Cake Block (bottom right) to round out my puzzle piecing layout. The cake is a free pattern. You never know when you are going to need a cake pattern. Am I right?


I added a skinny pink inner border and a texty, low volume outer border. The borders brought the size to a large lap quilt.

This January was my third annual Finish All Your Dang UFO's month. I did pretty good, maybe even better than previous years. I will share some more of my finished UFOs. When finished they either go on one of two piles: giveaway (family/friends or charity) or sell. I have reached the point of having quite enough quilts of my own.  This one will go to a family/friend.

Do you have a bunch of UFOs? Maybe a bunch of quilt tops that need to be quilted? You can mail the top and backing to Heather and she will help make those UFO's in to finished quilts. Her prices are great and she has all kinds of batting to choose from. The cost to mail back your quilt is very reasonable too. Check out some options HERE


Tuesday, March 17, 2015

Scrappy Fabric Card Tutorial


Hello everyone, I have a fun, and very quick tutorial for you. I had a pretty pile of left over rectangles from quilt project and I didn't want to throw them away.

What to do with them? I am in a few swaps on Instagram and I thought a pretty card set might be a fun gift to add to my packages.

I bought my cards here. The quality was great (and I couldn't beat the price). I tied 5 cards with a  vintage fabric measuring tape (or scrap of ribbon).


My cards came open (not folded yet) and I left it that way until the card was done. Cut your scraps into 3 strips sized to your card. I adhered each strip with a light spray of 505 Spray Adhesive and a little pressure on the card.


Sew each rectangle down close to the edge of the card.


Flip your card over and trim the fabric hang over. Yes, my ruler is broken. I just can't get rid of it.

Fold your card along the middle line and press with your finger. All done. Be sure to include the envelopes with your card sets.

As you can see I left the loose strings on my cards. I think it adds to its character but you can trim them neater.

Are you on Instagram? I am. And so is Heather. She will be holding several massive fabric destashes on her account so be sure to follow her and pick up great deals on out of print, hard to find, and new fabrics at great fabrics. 

You can find Heather's destash account under thequiltbarndestash
Her quilty projects are at thequiltbarn
And you can find me too at tinyglutton

Wednesday, January 28, 2015

Vintage Grandmother's Garden


It always makes me happy when I can see a quilt top come out from a box (or closet or grocery bag) and get finished. It has fulfilled its quilt destiny. Now this quilt can be used and enjoyed.

Whether its a family piece or something you scored at a thrift shop you can see your quilt top to the finish line.


This quilt top was quilted using a tiny stipple. This pattern gives quilts a crinkly vintage feel. Small quilting like this also helps hold together hand stitching, old thread that may have become a little brittle, and ensures it lasts for generations.


This is my favorite block, the tiny blue and pink flowers remind me of Bachelor Buttons, my mom's favorite.

Heather is having a special on this Tiny Stipple quilting pattern. You can mail or drop off your vintage or brand new quilt tops and she can set you up.  This small stipple is normally 2 cents per square inch and is on sale for 1.5 cents per square inch during the month of February. This applies to any quilt dropped off or postmarked during the month of February.  Quilts can be dropped off at the store on the following days between 10AM - 5 PM

  Wednesday, February 4th
  Saturday, February 7th
  Wednesday, February 11th
  Wednesday, February 18th
  Saturday, February 21st

Or...you can call Heather at (208) 420-3484 to make an appointment.  She lives so close and doesn't mind at all!

Click here to print off an order form to mail in with your quilt top and backing. Heather can also bind your quilt for a small fee.

Click here to read her policies and tips for preparing your quilt to send.

The Quilt Barn
241 Main Street N
Kimberly, ID
83341
www.thequiltbarn.com
(208) 423-5092

Tuesday, January 13, 2015

Our Kimberly, Idaho store will be closed today due to illness.  Sorry for any inconvenience!