Showing posts with label window. Show all posts

Wednesday, December 11, 2013

Christmas Window


Decorating the bed side of our large window for Christmas was a no brainer (which is good because I feel no brainer this time of year). A customer and friend made this quilt top out of Winter's Lane and we asked if we could display it. We all love it! 

This fabric line has been crazy popular. We have a few fat quarter bundles left and a wee bit of yardage.

The line came with a panel and that is what Jenele made the pillow out of. The poinsettia pillow is a project from a few Christmas windows ago. Anyone else have to look up ow to spell poinsettia? Every time for me.

Another reason we love this quilt so much is the pattern. We found out what it was an ordered the book. I can just picture this scrappy.


Jenele also made this garland using the panel. You could sew these rectangles on a plain card an make your own Christmas cards.

Many of my projects can't be shown until after Christmas. I am now officially behind on my sewing deadlines. How about you?

Run, don't walk, over to Crazy Mom Quilts Finish it up Friday. Her Scrap Vortex is amazing. 

Friday, October 18, 2013

Halloween Quilts

kk

I am a big fan of Halloween. Give me a shred of an excuse to "sew Halloween" and I will.
I knew when I saw Cloud 9 Fabrics No Bones About It pattern I had to make it. Its a quick and easy pattern. I cut a few extra kits for the shop and I put one on Etsy.


Heather made the Boo Crew Quilt. I love the minky ghosts and monsters.

I participated in a Halloween Swap this year and I sent off my made goodies Tuesday. I wonder if she got my package yet? I will share what I sent next post.

Happy Sewing!

Thursday, June 13, 2013

Vintage Wedding Window


I posted a teaser of our June window and you all are so smart, you got it right away.  Its a June Wedding.

The Mustard Seed in Twin Falls asked us if we were interested in a few vintage wedding dresses for our windows and we said a hearty "yes"!

I finished my Pickle Dish inspired quilt to go with Heather's vintage Double Wedding Ring quilt. The Pickledish quilt reminds me of the Wedding Ring quilt but with a modern twist.

Instead of sewing the curved solids background (as is in the tutorial) I raw edge appliqued the colored archs right on to the solid square background. I had run out of steam after making the archs but didn't want to waste all that time piecing.


I needed a cake for the window and was mulling over several idea. It needed to be easy and cheap.
I reused the old screen I had in the raindrop window and turned it on its side. I cut out 4 cake "layers" and sewed them on by hand right on to the screen.  The cake is decorated with felt flowers, aslo sewn on. Can you tell its a wedding cake or was I too subtle?
Now, I can use the screen over again. Maybe a Christmas tree in December?


As usual, I wanted some sort of bunting across the top of the window. I didn't want to do anything I had already done and was brainstorming with Laura and we came up with a genius idea. We pulled fat quarters we already had on the fq wall and tied the corners together. Done, and it cost nothing.


The 3 white dresses on their own are a little pale for the window so I dressed the 50's dress up with a pink pompom belt.


Heather stippled her vintage quilt top with a tight stipple.


The Gunny Sac dress has received lots of attention. Many people remember this style of dress.


The 1950's dress is my favorite. It has a removable jacket.
The other tiny dress could be a first communion dress (second picture). 
Has anyone been by and seen the window? What do you think? I am not on to thinking about the next window.

Next blog post will be the bed side window.

Linking up to Crazy mom Quilts Finish it up Friday

Wednesday, March 27, 2013

Drip Drop Little April Showers.

So I had this song stuck in my head the whole time I was cutting out raindrops, hanging rain drops, finding flowers, and making my quilt for this window display...


Spring is by far my favorite seasons.  I just love the release of the weight of winter and the newness it brings.  The colors are great and vibrant and the air is so refreshing!


It's been rainy and gray and cloudy the last couple of days. Today it is sunny and nice though. Spring is sure on its way!


As I said last week, this is the Spin Cycle (pattern by Cluck Cluck Sew) quilt I made specifically for the Spring window.  It was a fun one to make and I'm happy with how it turned out!


Amy made this awesome, bright quilt.  She used the BQ pattern and the fabric line called Cruizin'!  It features little bicycles and sweet flowers!  It's just so happy and fun!  Below is Tara's string block quilt...which is always a favorite pattern!


Fun bicycles from the Cruizin' line!!  So fun!


Happy Spring!  What are your new Spring sewing projects!?

Friday, March 22, 2013

Spring Window Project


 Our theme for our new spring window is raindrops.
I love to decorate the headboard and wanted to try something new. I love bunting but needed something fresh. I could decorate with bunting every time.

 I ventured in to the Quilt Barn basement and brought up 2 cream shutters and stuck them in front of the headboard. new headboard, check.

Then I tied twill tape to three spots on the heard board, at each side and the middle. Laura and I worked from each end and tied long lengths of selveges to the twill tape. A few years ago I started saving my selveges. I haven't saved any for about a year and still have a milk crate full.

Laura and I now have both windows finished and will share more pictures next week. We sure have fun with our windows.

And we now have more Type typewriter fabric in. That first round went in 2 days!
Have a great weekend!
Free Image Hosting at www.picturetrail.com

Monday, March 18, 2013

You Are What You Quilt...

So in college I had an awesome watercolor teacher that pointed out a very good point.  She said, "You are who you are, and who you are comes out in your art!"  How true that statement is!  As we students would present our pieces, she would always point out what we were wearing...and sure enough 80% of the time we were dressed with the same color pallet!


I wanted to make a quilt for our new Spring window and was having trouble seeing anything that would fit just right.  So on my day off I grabbed my mom and we headed to the Quilt Barn.  With heads together, we were able to pick some colors that were quite pleasant.  As I was cutting the fabric I needed, my mom said, "Look at your shirt!"  And would you believe it...I had picked the same colors I was wearing.  I always tell Tara that you are who you are...and this experience proves it!  So if I see you buying fabric the same as what you're wearing...I WILL tell you!!


So here's the finished product!  The quilt pattern is "Spin Cycle" by Cluck Cluck Sew and the fabric is just random pieces I pulled.  It is now in our "April showers bring May flowers" window.  (More to come about our window"  So if you're in the area come check it out!

And be sure to check out our retreat coming up with Adorn It. It is going to be a great event

Monday, February 4, 2013

Happy February! The Best Month of the Year!

February has rolled around and it was time for a new window!  Tara and I put together a Valentine's Day theme (no surprise there!)  Love is in the air...even at The Quilt Barn!


Tara made this very playful and fun Mad Hat quilt, pattern from the Quilted Fish!  She used different teal and pink fabric around the store.  Including, Vintage Modern, Flirt, and Flea Market Fancy!  Aren't those pompoms awesome!


I worked on a pattern by Cluck Cluck Sew called Pow Wow.  It was such a fun simple pattern that I was able to finish in a weekend!  I also picked a pink and teal color pallet but I threw in a bit of green because green is the best color of all colors!


This quilt I made using Marmalade flannel charm squares and creamy white yardage.  I was inspired by a pattern in the book Modern Designs for Classic Quilts which is a book that the Quilt Barn carries. I think the colors are just so fresh and clean!

Yep, that was a pictures overload!  But come stop by and check out our window in person!  And enjoy the best month of the year!


Thursday, December 13, 2012

Grinch Christmas Quilt with Mini Pattern


I realized I haven't shown you the other Christmas window, it's The Grich.

The iron bed got a new Grinch quilt made for it and I layered it over a Moda red and white polka dot quilt. I wove a pine garland through the head board and hung a large lighted wreath from the top. A gold and red "G" was placed in the middle.

I found the Grinchy green stockings at The Dollar Store. My vintage tinsel tree and tinfoil garland sit near by.  The red star on top is also from The Dollar Store.


This was a really easy quilt and it came together fast. Amy liked it so she made 6. Seriously. That girl.


I had enough leftovers I made a pillow to go with the quilt. More Grinchy green was added with jumbo ricrac.


Amy quilted an all over Christmas ornament pattern and it looks fab. Thanks Amy.


Merry Grinchmas!!

If you want to make your own Grinch quilt here is what you will need:

-2 Grinch panels, 20 rectangles total (this will be a 4 block by 5 block with small inner and larger out border quilt)
-black inner border 6-2" strips
-outer border 7-6" strips
-block sashing 10 different fabrics 3-2.5" strips each
-backing: I used a directional Grinch fabric so I cut 2.5 yards and pieced the whole width vertical with a solid from my sash to round out the width
-binding 7-2.5" strips

  Cut our your blocks on the block outlines. Add a 2.5" strip to the side and sew using a 1/4" seam. Iron open and trim. Add the trimmed piece to the other side, iron open, and trim. Repeat for the top and bottom.
 Repeat for all 20 blocks. If my block had mostly red I used a green sashing and vice versa.
 Lay out your blocks in a 4X5 alternating green-red pattern. Rearrange to your liking and sew the rows together and then join the rows.
 Add your small inner black border then the larger outer border. Tada, you are done.

And that is my mini pattern.

Finished quilt size 56X84 You can find Grinch fabric here


Free Image Hosting at www.picturetrail.com

Thursday, November 29, 2012

Christms Window, Stockings


Getting a full view picture of our windows isn't easy but Laura managed to get a good shot of our Cozy Cabin window.

To start I hung a couple of red plaid table cloths from my thrift stash to create a festive backdrop. The church pew was centered and placed on a vintage handmade wool braided rug. I picked up two at our local Methodist Church spring rummage sale.

A rustic wood bench serves as our coffee table.  A sled, small trees and, and child's wicker chair round out the scene.

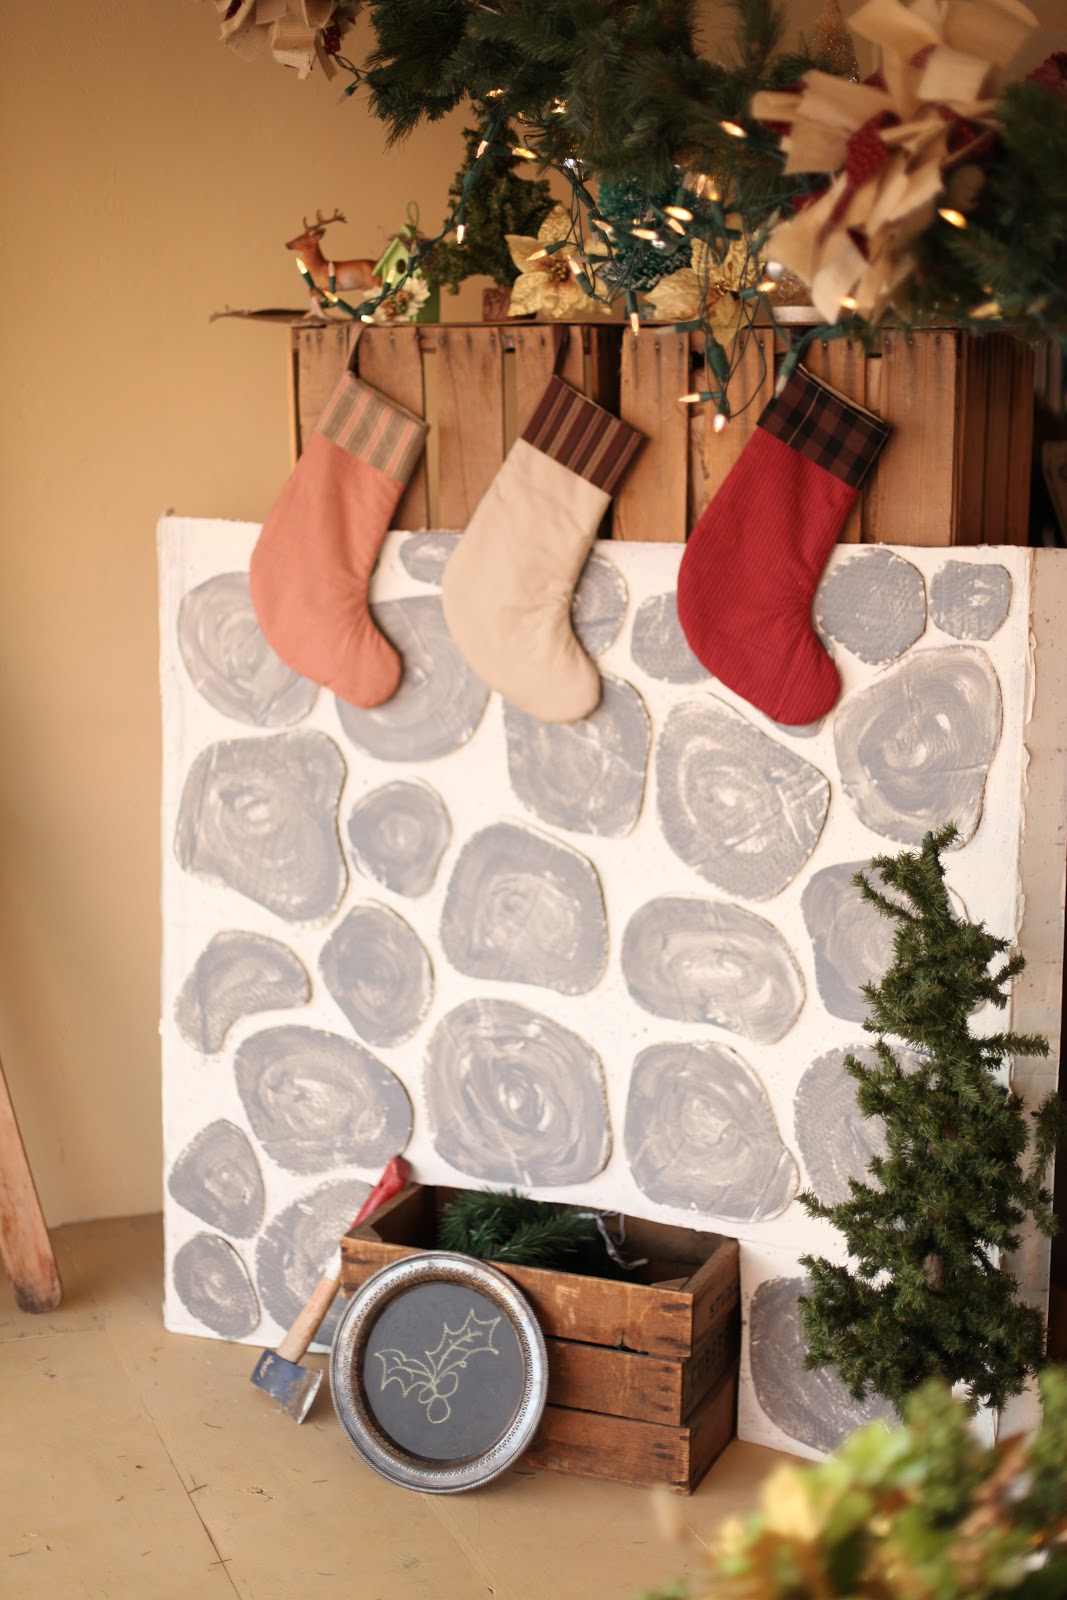
We knew we wanted a fireplace and making one out of cardboard fit our budget. I saved this huge piece of cardboard for several months waiting to make this project. I cut various rock shapes and glued them on to the front of the fireplace with hot glue.
 The base got a coat of cream the the rocks got a swirl of grey paint with a foam brush. I only had to buy a small tester pot of the grey paint.
 I finished it off with a few flicks of grey paint from a brush to give the whole piece a flecked look. I leaned the front against the butcher's table that is permanently in our window and placed a few crates on top for height.
I slipped another crate partially in a cut out fire box added a hatchet and a chalkboard painted silver tray. If I had a few logs I would have stuck them up out of the box.  One $2.50 (for paint) fireplace, done.


Of course stockings have to be made for the fireplace. Laura was in charge of that and she picked out some great wintery brushed cottons for a vintage feel..


We hung a lighted garland across the top of the display and hung fun gold ornaments. The ornaments are from the dollar store. I also made and hung 4 large burlap and red fabric strip pompopms. Can you see them in the first picture? I used this tutorial from Cleverly Inspired.
Free Image Hosting at www.picturetrail.com

Wednesday, November 28, 2012

Star Wheel Quilt


We like to feature a quilt in our themed windows and over in our Cozy Cabin window is the Star Wheel Quilt, perfect for snuggling under during those frosty nights.
We draped it over an old church pew and it shares it seat with a large pair of antlers.


Big thanks to our friend Trina, she knocked out our shop sample for us.  We have a few kits left. I put one in our etsy shop if you would like one too.


The circles and stars are raw edge and fusible applique. The pattern is from the book Scrap Quilts Go Country. Amy long arm quilted an all over stipple design.  Amy does a lot of local long arm quilting but we also receive quilts in the mail from all over. You can get more info here.

Free Image Hosting at www.picturetrail.com

Tuesday, November 27, 2012

Dollar Store Christmas Tree Garland


I am back from my Thanksgiving holiday (the girls and I went to Victoria, BC for the week) and am geared up for Christmas. And Christmas blogging. A few days before I left Laura and I hustled to get our Quilt Barn Christmas windows all set up.
Have you been by and seen them? What do you think? Laura took great pictures and I will be sharing what we did and what we made.

First up is our Christmas tree. I knew our colors were Grinch green, red and white. We had the oversized Christmas ornaments in our treasure trove basement, I had ropes upon ropes of red bead garland so all we needed was something to fluff it up. I checked around locally and wide ribbon is expensive. Our windows have limited budget (because we like to see what we can come up with without spending money).

The green and white garland on our tree? Dollar Store bath puffs. I used 3 of each color. Here is what I did: 


Dollar Store bath puffs. I used 3 of each color. Here is what I did: 


You simply have to snip the string in the middle of the puff to release the layers of mesh. Pull gently.


Tada, tree garland for 6 dollars. You could buy more and make it even more loopy and puffy.

Another money saver is our tree skirt. We needed 2 and I only had one made. There wasn't time to make one and my budget was nil. I headed to my favorite thrift store and picked up the green and white circle fringed table cloth for one dollar. I cut it up to the middle and cut a circle to accomodate the tree base.

Like free patterns? Me too. All this week Tula Pink is giving us a free pattern a day to promote her newest fabric line. Stop by each day to get that day's pattern while its up.
Free Image Hosting at www.picturetrail.com